Category: Security

  • Hashing & Data integrity

    Hashing is the process of using a hash function in computing and cryptography that converts data into a fixed-sized string of characters, typically a sequence of letters and numbers.  For example, the operating system on your pc stores passwords as hashes. The operating system uses a hashing function to hash your password and stores it in a database. Whenever you log in, the OS hashes your entered password, compares it with the hash stored in the password database, and logs you in if they match. For added security, the operating system salts the hashes. Salting is the process of adding a random string to the password before hashing it. Hashing is a one-way process. That means you cannot take a hash and recover the original data.

    Hashing is also used for keeping data integrity. Data integrity means that the data has not been altered or corrupted during storage or transmission. Before you send or copy data to a removable medium, the hash value is computed using a hash function. Later, when the data is received, the hash value is recomputed. If the hash values match, the data is intact. If it does not match, the data is altered or corrupted.

    For example, if you are sending video footage as evidence on a flash drive, you can hash it and save the hash value. Once it reaches the target, it can be hashed again and compared with the original hash value to check whether the file has been tampered with. If the hash value differs, the file is evidently corrupted in transit.

    Functions used for hashing.

    There are different functions operating systems use for hashing.

    MD5 (fast, but not secure for cryptographic purposes)

    SHA-256 (secure and widely used)- By defalut , windows uses SHA-256

    SHA-512 (even stronger)

    Hashing is one of the best ways to keep data integrity. It is irreversible, deterministic ( same input always give same hash), and Fast.

  • Google updates Chrome — fixes around 20 vulnerabilities.

    The latest Chrome version, 142, released by Google on October 28th, includes patches to fix several documented vulnerabilities, some of which are high-severity. The update includes permission to block local network access from public/local websites. Chrome now blocks websites from sending requests to local network devices (like routers, printers, or software running on your machine) unless you explicitly grant permission. When a website tries to access your local network, it will ask you if it can “look for and connect to any device on your local network”. You can allow or deny. If you deny, the websites will not be able to connect to your local network.

    Why do websites need access to local networks?

    Smart home applications like Google Home require access to smart devices in your home, while streaming devices need to interact with smart TVs and speakers. Additionally, printing from websites necessitates communication with printers. However, granting access to your local network poses security risks, as malicious websites can potentially access, track, and exploit your devices.

    1. What is Local Network Access?

    Local Network Access (LNA) allows websites to communicate with devices on your home or office network (e.g., printers, smart TVs, routers). Chrome 142 now asks for permission before granting this access.

    2. Why Does Chrome Ask for Permission?
    • Security: Prevents malicious sites from probing your network or exploiting vulnerable devices.
    • Privacy: Stops websites from fingerprinting your network setup.
    3. When Should You Allow Access?

    Allow only if:

    • You trust the website (official vendor or service you use regularly).
    • You understand why it needs access, such as:
      • Smart home control (e.g., Philips Hue, Google Home).
      • Media streaming (e.g., Plex, Spotify Connect).
      • Enterprise tools (e.g., Box, Teams for printer integration).
      • Local development/testing (e.g., Selenium, TestCafe).
    4. When Should You Block Access?

    Block if:

    • The site is unknown or suspicious.
    • You are not using any local device integration.
    • The request seems unnecessary (e.g., a shopping site asking for local access).
    5. How to Manage Permissions
    • Check Current Settings:
    • Go to chrome://settings/content/localNetworkAccess.
    • Add Trusted Sites:
    • Under Allowed, add domains you trust.
    • Remove Sites:
    • Delete any site you do not recognise.
    6. Tips for Safe Usage
    • Always use HTTPS when granting access.
    • Avoid granting access on public Wi-Fi.
    • Review permissions periodically.

    To brief things , Chrome version 142, addresses over 20 security vulnerabilities, including 7 high-severity issues. Notably, Google awarded over $100,000 in bug bounties for two critical flaws in the V8 JavaScript engine.

    To stay protected and reduce the risk of exploitation:

    Update Chrome to the latest version immediately

    Restart your browser after updating.

  • Python script to check if VDB databases are updated in Cisco FMC

    To check if VDB databases are updated in Cisco FMC and print the results to an Excel file using Python, you can use the following approach:

    1.Access Cisco FMC through API: Use the Cisco FMC API to retrieve the VDB database information. You can find more details about the API in the Cisco FMC API documentation.

    import requests
    import json

    fmc_feeds_url = “https://10.10.10.10/api/fmc_feeds/access”
    fmc_headers = {‘content-type’: ‘application/json’}
    fmc_auth = (‘admin’, ‘YourPassword’) # replace ‘YourPassword’ with your actual password

    response = requests.get(fmc_feeds_url, headers=fmc_headers, auth=fmc_auth, verify=False)
    feeds = json.loads(response.text)

    2.Parse the API response: Extract the VDB database information from the API response.

    vdb_databases = [feed for feed in feeds[‘items’] if feed[‘name’].startswith(‘VDB’)]

    3.Create an Excel file and print the results: Use a library like pandas to create an Excel file and print the results.

    import pandas as pd

    df = pd.DataFrame(vdb_databases)
    df.to_excel(‘VDB_databases.xlsx’, index=False)

  • How to set up AnyConnect VPN in Cisco Firepower Threat Defense (FTD)

    How to set up AnyConnect VPN in Cisco Firepower Threat Defense (FTD)

    here’s a step-by-step guide on how to set up AnyConnect VPN in Cisco Firepower Threat Defense (FTD):

    Prerequisites

    1. Ensure you have a valid AnyConnect license for your FTD device.
    2. Familiarize yourself with the FTD device model and its maximum concurrent remote access VPN sessions (refer to the “Device Model” table in the search results).

    Step 1: Configure Remote Access VPN Policy

    1. Log in to the Firepower Management Center (FMC) web interface.
    2. Navigate to Objects > VPN > Remote Access VPN Policy.
    3. Create a new policy or edit an existing one.
    4. Configure the policy settings, such as:
      • VPN protocol (SSL or IPsec-IKEv2)
      • Authentication method (e.g., client certificate, username/password)
      • Authorization and accounting settings
      • URL Aliases (if required)

    Step 2: Configure Client Profiles

    1. Navigate to Objects > VPN > Client Profiles.
    2. Create a new profile or edit an existing one.
    3. Configure the profile settings, such as:
      • AnyConnect module (e.g., AMP Enabler, ISE Posture)
      • Profile type (e.g., XML, ASP)
      • File extension (refer to the “Table 8. Supported File Extensions of Profiles” in the search results)

    Step 3: Upload AnyConnect Images

    1. Navigate to Objects > VPN > AnyConnect Images.
    2. Upload the required AnyConnect images (based on the operating system requirements).
    3. Select the desired image for each operating system (e.g., Windows, macOS, iOS, Android).

    Step 4: Configure Remote Access VPN Connection

    1. Navigate to Devices > Remote Access.
    2. Select the FTD device and click Edit.
    3. Configure the remote access VPN connection settings, such as:
      • VPN protocol
      • Authentication method
      • Authorization and accounting settings
      • Split tunneling (if required)

    Step 5: Save and Deploy Policy

    1. Save the remote access VPN policy.
    2. Deploy the policy to the FTD device.

    Step 6: Verify AnyConnect Client Installation

    1. Ensure that the AnyConnect client is installed on the remote user’s device.
    2. Verify that the client is configured to connect to the FTD device using the correct VPN protocol and settings.

    Additional Considerations

    • Ensure that the FTD device is configured to allow remote access VPN connections.
    • Verify that the FTD device has sufficient resources (e.g., CPU, memory) to handle the maximum concurrent remote access VPN sessions.
    • Consider configuring NAT exemption and hairpinning (if required) to allow AnyConnect clients to access internal resources.

    By following these steps and considering the additional considerations, you should be able to successfully set up AnyConnect VPN in your Cisco FTD device.

  • Deleting a Stuck Deployment Notification in Cisco FMC

    Deleting a Stuck Deployment Notification in Cisco FMC

    Its frustrating it can be when a Cisco Firepower Threat Defense (FTD) deployment gets stuck and keeps showing up in notifications. Let’s sort it out this issue:

    1. Deleting a Stuck Deployment Notification:
      • To remove a stuck deployment notification, follow these steps:
        1. Log in to the Firepower Management Center (FMC).
    2. Switch to the root user:
      • expert
      • sudo su –
    3. Use the OmniQuery.pl tool to query the database and find the running tasks:
      • OmniQuery.pl -db mdb -e “select status, category, hex(uuid), body from notification;” | grep ” \ 7\ “
    4. Identify the UUID of the running task.
    5. Delete the deployment notification using one of the following commands:
      • OmniQuery.pl -db mdb -e “delete from notification where uuid=unhex(‘YOUR_UUID_HERE’);”
    6. The notification should clear out after a 5-minute health check or can be manually cleared from the Health

  • How to use Packet Tracer on Cisco ASA

    How to use Packet Tracer on Cisco ASA

    Packet tracer feature used to verify the security mechanisms as packet moves from one interface to another in a cisco ASA firewall. By this we can troubleshoot why the traffic is not working in the firewall or whether we created the rule correctly or not

    A typical series of security features tested might look like the following:

    • Flow lookup: Checks for existing xlate and conn entries.
    • UN-NAT: Checks for address translation entries.
    • Access list lookup: Checks for any applicable ACL entries.
    • IP options lookup: Checks handling of IP options in the ingress packet.
    • NAT: Checks the Reverse Path Forwarding (RPF) information.
    • NAT: Checks for host connection limits.
    • IP options lookup: Checks handling of IP options in egress packet.
    • Flow creation: Creates new xlate and conn entries, if needed.
    • Route lookup: Checks for a router to the destination address.

    Using Packet Tracer

    • Login to the ASA and go to enable mode:
    • login as: admin
    • dmin@10.1.10.1
    • password: Type help or ‘?’ for a list of available commands.
    • Corp-Hq-Fw01> en Password: Corp-Hq-Fw01#
    • Gather the required information for your packet trace:
      • The interface you wish the traffic to originate from
      • The type of traffic you wish to spoof, with TCP, UDP, ICMP (all types) or RawIP traffic supported.
      • The source port (if applicable) you want the traffic to originate from.
      • The destination port (again, if applicable) you want the traffic to be destined to.

    Now type in the command, syntax is

    packet-tracer input $source-interface $traffic-type $src_address $src_proto $src_proto_options $dest_address
    
    • In this instance let’s test
    • Inside interface address
    • ICMP traffic
    • Destined for google 8s

    Corp-Hq-Fw01# packet-tracer input inside icmp 10.1.10.5 8 0 8.8.8.8
    
    Phase: 1
     Type: ROUTE-LOOKUP
     Subtype: Resolve Egress Interface
     Result: ALLOW
     Config:
     Additional Information:
     found next-hop X.X.X.X using egress ifc OUTSIDE
    
    Phase: 2
     Type: ACCESS-LIST
     Subtype:
     Result: DROP
     Config:
     Implicit Rule
     Additional Information:
    
    Result:
     input-interface: inside
     input-status: up
     input-line-status: up
     output-interface: OUTSIDE
     output-status: up
     output-line-status: up
     Action: drop
     Drop-reason: (acl-drop) Flow is denied by configured rule
    

    The traffic is blocked in the firewall because there is no rule for created for ICMP. Lets do the test again after creating rule to allow ICMP in the firewall

    Corp-Hq-Fw01# packet-tracer input inside icmp 10.1.10.5 8 0 8.8.8.8
    
    Phase: 1
     Type: ROUTE-LOOKUP
     Subtype: Resolve Egress Interface
     Result: ALLOW
     Config:
     Additional Information:
     found next-hop X.X.X.X using egress ifc OUTSIDE
    
    Phase: 2
     Type: NAT
     Subtype:
     Result: ALLOW
     Config:
     object network REDOUBT
     nat (inside,OUTSIDE) static X.X.X.X
     Additional Information:
     Static translate 10.1.10.0/0 to X.X.X.X/0
    
    Phase: 3
     Type: NAT
     Subtype: per-session
     Result: ALLOW
     Config:
     Additional Information:
    
    Phase: 4
     Type: IP-OPTIONS
     Subtype:
     Result: ALLOW
     Config:
     Additional Information:
    
    Phase: 5
     Type: INSPECT
     Subtype: np-inspect
     Result: ALLOW
     Config:
     class-map inspection_default
     match default-inspection-traffic
     policy-map global_policy
     class inspection_default
     inspect icmp
     service-policy global_policy global
     Additional Information:
    
    Phase: 6
     Type: INSPECT
     Subtype: np-inspect
     Result: ALLOW
     Config:
     Additional Information:
    
    Phase: 7
     Type: NAT
     Subtype: rpf-check
     Result: ALLOW
     Config:
     nat (any,OUTSIDE) after-auto source dynamic any interface
     Additional Information:
    
    Phase: 8
     Type: USER-STATISTICS
     Subtype: user-statistics
     Result: ALLOW
     Config:
     Additional Information:
    
    Phase: 9
     Type: NAT
     Subtype: per-session
     Result: ALLOW
     Config:
     Additional Information:
    
    Phase: 10
     Type: IP-OPTIONS
     Subtype:
     Result: ALLOW
     Config:
     Additional Information:
    
    Phase: 11
     Type: USER-STATISTICS
     Subtype: user-statistics
     Result: ALLOW
     Config:
     Additional Information:
    
    Phase: 12
     Type: FLOW-CREATION
     Subtype:
     Result: ALLOW
     Config:
     Additional Information:
     New flow created with id 725694429, packet dispatched to next module
    
    Result:
     input-interface: inside
     input-status: up
     input-line-status: up
     output-interface: OUTSIDE
     output-status: up
     output-line-status: up
     Action: allow

    As you can see above, ping passes through the firewall successfully

    • You can see the initial routing decision(Phase 1),
    • that the traffic hit the outside interface NAT (Phase 2 & 3)
    • and that it passed ICMP inspection (Phase 5)
  • Introduction To Cisco ASA Firewall

    Introduction

    • In computer networking, Cisco ASA 5500 Series Adaptive Security Appliances, or simply Cisco ASA, is Cisco’s line of network security devices introduced in May 2005, that succeeded three existing lines of popular Cisco products:
    • Cisco PIX, which provided firewall and network address translation (NAT) functions ended sale on 28 July 2008.
    • Cisco IPS 4200 Series, which worked as intrusion prevention systems (IPS).
    • Cisco VPN 3000 Series Concentrators, which provided virtual private networking (VPN).
    • The Cisco ASA is a unified threat management device, combining several network security functions in one box.

    Cisco ASA Features

    • antivirus
    • antispam
    • IDS/IPS engine
    • VPN Device
    • SSL Device
    • content inspection

    ASA Models and their throughputs

    • Cisco ASA 5505
    • Cisco ASA 5510
    • Cisco ASA 5520
    • Cisco ASA 5525-X
    • Cisco ASA 5540
    • Cisco ASA 5550
    • Cisco ASA 5580-20
    • Cisco ASA 5580-40
    Model5506-X5506W-X5506H-X5508-X5512-X5515-X5516-X5525-X5545-X5555-X5585-X
    Throughput Gb/s0.250.250.250.450.30.50.851.11.51.754-40
    GB ports88486688886-8
    Ten GB ports00000000002-4
    Form factordesktopdesktopdesktop1 RU1 RU1 RU1 RU1RU1RU1RU2RU


    ASA Architecture

    • ASA is an application-aware stateful packet filtering firewall
    • Inspects all the packets which are passing through the firewall
    • Each and every interface on ASA requires configuration of following parameters

    ASA Architecture

    • ASA is an application-aware stateful packet filtering firewall
    • Inspects all the packets which are passing through the firewall
    • Each and every interface on ASA requires configuration of following parameters

    1.Interfaces with name and IP Address Add block

    2.Security Level

    ASA security levels

    • By default ,the security level is automatically set to the interface once name is configured §ASA uses security level 100 for trusted or internal networks and 0 for un-trusted or public networks
    • We can configure security levels to other interfaces also like DMZ 50
    • By default, traffic from higher traffic level to lower are allowed or inspected, all other traffic is blocked
    This image has an empty alt attribute; its file name is image.png
  • Introduction to Firewall

    WHAT IS FIREWALL

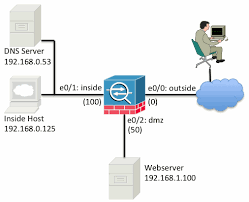
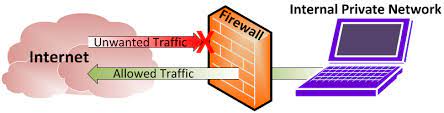
    A firewall is a network security device, either hardware or software-based, which monitors all incoming and outgoing traffic and based on a defined set of security rules it accepts, rejects or drops that specific traffic.

    Accept : allow the traffic

    Reject : block the traffic but reply with an “unreachable error”

    Drop : block the traffic with no reply

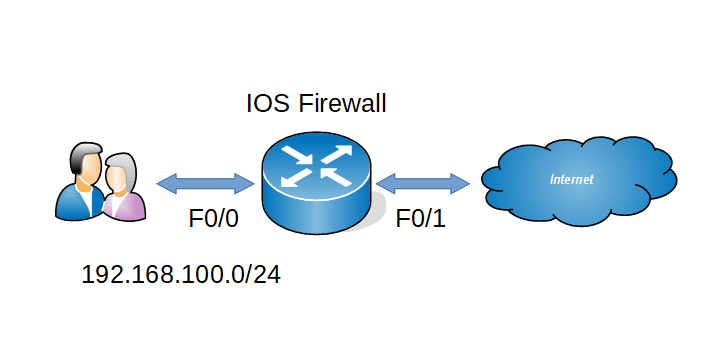
    A firewall establishes a barrier between secured internal networks and outside untrusted network, such as the Internet.

    HISTORY AND NEED FOR FIREWALL

    Before Firewalls, network security was performed by Access Control Lists (ACLs) residing on routers. ACLs are rules that determine whether network access should be granted or denied to specific IP address.

    But ACLs cannot determine the nature of the packet it is blocking. Also, ACL alone does not have the capacity to keep threats out of the network. Hence, the Firewall was introduced.
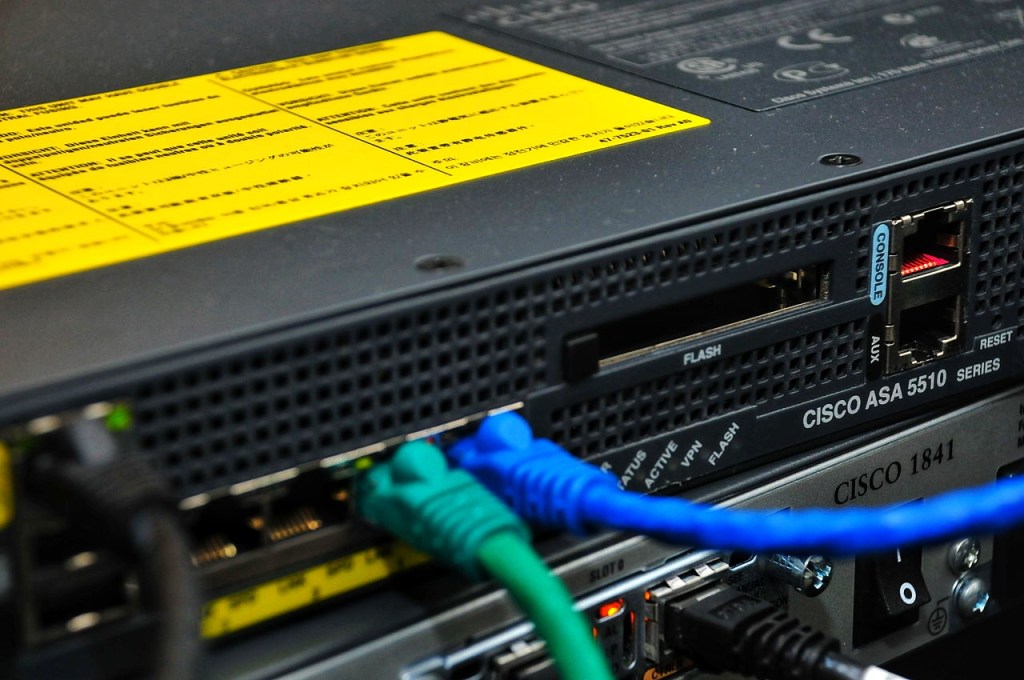
    TYPES OF FIREWALL

    There are two types of firewalls: software and hardware.

    Hardware firewalls are built into network devices such as routers and can protect every single machine on a network and require little configuration to work effectively. They use packet filtering techniques to examine the header of a packet, determining his source and destination and then, comparing the data to a set of predefined rules, they decide whether to drop the packet or forward it to the next step or to its destination.

    Software firewalls are the most popular network protection method for home users. They usually come as stand-alone applications or as part of a complete anti virus protection software, such as Kaspersky, AVG etc. Besides providing protection for inbound and outbound traffic, a software firewall can also protect against Trojan or Worm applications and allows various options of control over its functions and features.

    GENERATION OF FIREWALL

    First Generation- Packet Filtering Firewall : Packet filtering firewall is used to control network access by monitoring outgoing and incoming packet and allowing them to pass or stop based on source and destination IP address, protocols and ports. It analyses traffic at the transport protocol layer (but mainly uses first 3 layers).

    Packet firewalls treat each packet in isolation. They have no ability to tell whether a packet is part of an existing stream of traffic. Only It can allow or deny the packets based on unique packet headers.

    Second Generation- Stateful Inspection Firewall : Stateful firewalls (performs Stateful Packet Inspection) are able to determine the connection state of packet, unlike Packet filtering firewall, which makes it more efficient. It keeps track of the state of networks connection travelling across it, such as TCP streams. So the filtering decisions would not only be based on defined rules, but also on packet’s history in the state table.

    Third Generation- Application Layer Firewall : Application layer firewall can inspect and filter the packets on any OSI layer, up to the application layer. It has the ability to block specific content, also recognize when certain application and protocols (like HTTP, FTP) are being misused.

    In other words, Application layer firewalls are hosts that run proxy servers. A proxy firewall prevents the direct connection between either side of the firewall, each packet has to pass through the proxy. It can allow or block the traffic based on predefined rules.Note: Application layer firewalls can also be used as Network Address Translator(NAT).

    Next Generation Firewalls (NGFW) : Next Generation Firewalls are being deployed these days to stop modern security breaches like advance malware attacks and application-layer attacks. NGFW consists of Deep Packet Inspection, Application Inspection, SSL/SSH inspection and many functionalities to protect the network from these modern threats.

    TOP 5 NEXT GENERATION FIREWALL VENDORS

  • How to configure CBAC in Cisco router

    How to configure CBAC in Cisco router

    Context Based Access Control (CBAC) is an IOS firewall feature set similar like RACL, RACL is basically inspect L2- L4 layers only but CBAC has the capability of inspecting application layer traffic.

    Now we can see the configurations

    Step 1 : Create one ACL to deny all incoming traffic from the internet

    Step 2 : Create inspect rule for our internal traffic

    Step 3 : Applying the inspect rule

    By these commands we have enabled inspection for http,https,dns traffic and the router will only allow the inspected traffic .

    Verification

  • How To Configure Reflexive ACL in Cisco Router .

    RACL is a type of ACL which will permit only the external traffic which is originated from inside and it will block all other external traffic . RACL will keep the session table of the outgoing traffic and it will check the external traffic with that particular session table .

    Find below for the configurations

    Step 1 : Create outbound ACL to reflect outgoing traffic

    Step 2 : Create inbound ACL to evaluate the RACL

    Verification

    Thus router will block all outside traffic and permit only return traffic of the inside network.